Advanced LaTeX
- Using Packages
- Document Types
- Sections
- Non-numbered Sections and Subsections
- Changing Your Headers and Footers
- Just What Are All Those Files?
- Multiple Columns
- Comments
- Marginal Notes
- Making Space
- Fixing Bugs
- Splitting Documents into Separate Files
- Verse
Using Packages
While writing your document, you will probably find that there are some areas where basic LaTeX cannot solve your problem. If you want to include graphics, colored text or source code from a file into your document, you need to enhance the capabilities of LaTeX. Such enhancements are called packages. Packages are activated with the \usepackage[ options]{ package} command, where package is the name of the package and options is a list of keywords that trigger special features in the package. Almost all packages are provided separately from the CTAN.org repository, but your installation probably has all of those below.
Commonly Used Packages
|
Name
|
Description |
|
babel
|
Write in multiple languages in one document, correct hyphenation for each language, translations for document elements, and commands for easy type input are provided. |
|
multicol
|
Easily make just a section of text multiple columns. |
|
amslatex
|
The American Mathematical Society's official math package |
|
textcomp
|
Enables special symbols like degree, the euro, and others |
|
longtable
|
Multi-page tables. |
|
graphicx
|
Enables the insertion and modification of images. |
Document Types
The first command in any LaTeX file determines the format for the entire document.
\documentclass[ options]{ class}
You can either use one of the four standard LaTeX classes, book, report, article, or letter, or a contributed class designed by an individual and contributed to the CTAN.org archive. A good example of a custom class is the Reed Thesis Template.
| Article | The article class is perfect for papers and journal articles. It puts the title, author, and date on the first page (if you request a title page) and starts the main body of text on the same page. This class does not allow chapters, but does allow parts, sections, and subsections. |
| Book | This is the most complex class. Unlike the report class, the book class treats odd and even pages differently and prints the chapter or section title on each page in the header. If you are creating a document with many chapters or want it to look like a professional book, you should use the book class. If you find the book class too limiting, you may want to use the memoir class. |
| Report | A report may have chapters. It is a less complicated version of the book class, often used for theses and other short multi-chapter documents. The Reed Thesis Template is based on the Report class. |
| Resumes | Many LaTeX users have created custom resume classes. By searching Google for "LaTeX resume", you can find a large number of varying designs and styles, including academic CVs and professional resumes. Follow the directions accompanying whatever resume you choose to use. |
Sectioning
For long documents like a thesis or long paper, you may need multiple sections of text. You may have parts, chapters, sections, and subsections. These sectioning commands take care of numbering, formatting the heading, include the section in the table of contents, and put the section title and number in the header at the top of the page. Each sectioning command uses the same syntax:
\section{ title}
If you want the table of contents entry to be different from the section name (often because of length), you should specify the name in square braces:
\section[ TableOfContents_Entry]{ title}
If you want the section unnumbered, you should add an asterix after the command name:
\section*{ title}
However this means it will not be in the table of contents. If you need it in the table of contents, include the following line proceeding the sectioning command.
\setcounter{chapter}{1} This will increment the counter so it will show up properly in the table of contents (ToC).Make sure {subsection} is used for \subsections, {section} for \sections and so on. You don't want the headings to show up at the wrong depth.
\chapter*{The First}
\addcontentsline{toc}{chapter}{The First} This adds a chapter called The First to the ToC.
The sectioning commands are slightly different for long documents versus short documents. In your thesis you will want to use those for Book and Report classes, but if you're just writing a term paper you will probably want those for the Article class. Remember, you don't need to use all the commands, particularly the \paragraph and \subparagraph; experiment and see what looks best.
|
Book and Report Classes |
Articles |
|
\part |
\part |
|
\chapter |
\section |
|
\section |
\subsection |
|
\subsection |
\subsubsection |
|
\subsubsection |
\paragraph |
|
\paragraph |
\subparagraph |
|
\subparagraph |
Non-numbered Sections and Subsections
If you would like non-numbered sections and subsections in your thesis, and you would also like them to appear correctly in manually-created headings (using \markboth{LeftSideHeading}{RightSideHeading}), add the following to your reedthesis.cls file.
\newcommand{\nonumsection}[1]{\section*{#1}
\addcontentsline{toc}{section}{#1}
%\sectionmark{#1}}
\markboth{#1}{#1}}
 \newcommand{\nonumsubsect}[1]{\subsection*{#1}
 \addcontentsline{toc}{subsection}{#1}}
%\subsectionmark{#1}}
Changing Your Headers and Footers
In A Thesis
There are many modifications people want for their thesis headers. The main ones are: the appearance (without changing what the header actually says) and to change the header to their chapter title instead of the current \section.
To fix the running headers to not be uppercase:
- Make a backup of reedthesis.cls (it's good idea to have a backup anyway).
- Open reedthesis.cls
- Find the header lines:
-
\fancyhead[RE]{\slshape \leftmark}
\fancyhead[LO]{\slshape \rightmark} - Change 'em how you like it:
-
\fancyhead[RE]{\slshape \nouppercase \leftmark} This makes the headers on the right side pages be italic and use lowercase With Capitals When Specified.
\fancyhead[LO]{\slshape \nouppercase \rightmark} This does the same thing to the left side pages
or
\fancyhead[RE]{\scshape \leftmark} The headers will be in S MALL C APS.
\fancyhead[LO]{\scshape \rightmark}
If you want each of your headers to say the name of the chapter (or something else specific), and not take their name from different sections, back out of the reedthesis.cls and go to thesis.tex.
Then where ever you start a chapter, define your headers, like so:
\chapter{Introduction}
\fancyhead[LE,RO]{\thepage}
\fancyhead[RE]{\slshape Introduction}
\fancyhead[LO]{\slshape Introduction}
In The Article Class
You can make a header using the my headings page style. You will have to use \markboth{ left page header}{ right page header} to specify the header and adjust the spacing of the header with \headheight and \headsep commands. All this is in the preamble.
Here's how the myheadings page style is used to make headings:
\pagestyle{myheadings}
\markboth{This is on the even-numbered page}{This is on the odd-numbered page}
\setlength{\headheight{1 ex}} This specifies the gap left for the header
\setlength{\headsep{1.5 ex}} Defines the space between the header and the body.
The command \markright can be used to only define the--you guessed it--header on the right side pages (or all pages, if printing single-sided). The command \thispagestyle is used to change the style of the current page only (do this in the text). You can also replace myheadings with other page styles:
- plain The page header is empty and the footer has the centered page number. This is the default for the article class.
- empty The page header and footer are empty. This appropriate for the first page of a paper according to the Chicago Manual of Style.
- headings The header contains the page number and title (of the section or chapter} and the footer is empty. This is the default for the book class.
Footers
LaTeX numbers the pages by default; here's how to modify or eliminate the numbering. If you were looking for information on footnotes, look at the General Paper topics.
The command \pagenumbering{ numbering style}, in the preamble like \pagestyle, enables you to change the numbering from Arabic numerals (the default) to Roman numerals, the Roman alphabet or eliminate the numbering entirely:
| arabic | Arabic numerals (1, 2, 3) |
| roman | Lowercase Roman numerals (i, ii, iii) |
| Roman | Uppercase Roman numerals (I, II, III) |
| alph | Lowercase Roman alphabet (a, b, c) |
| Alph | Uppercase Roman alphabet (A, B, C) |
| empty | No numbering |
Note: \pagestyle{empty} eliminates both numbering and headers. If you want a header but don't want page numbers, stick with \pagenumbering{empty}.
To suppress the page number on only one page, stick \thispagestyle{empty} where necessary. If you want the first page to not have a number, put it right after \begin{document}.
To make the page numbers start at a number (or level) other than 1, put \setcounter{page}{ desired number} in the preamble or after \begin{document}. So if you wanted to skip a bunch of pages in your document and have pages 1-5 and 10-25, place \setcounter{page}{10} after the text on page 5. Because you can't tell exactly which page starts where without typesetting, this may require a bit of adjustment.
Just What Are All Those Files?
You probably have noticed the profileration of files created by LaTeX with every new document. All will have the same name as the new document, but end with a different extension. Each file fulfills an important function for LaTeX. However, when you are backing files up, only the .tex, .bib, .bst and .sty files are necessary. If you want to send someone your document and they don't want to typeset it (say, your thesis adviser), then just the pdf is necessary.
- Document.tex This is the file where you actually write your paper or thesis and will spend most of your time.
- Document.pdf After you typeset your document by pressing "Latex" or "Typeset", any changes in your .tex will now appear in the final product, the .pdf file.
- Document.aux This file stores information to support citations and other parts of the bibliography.
- Document.bib This is the text file BibTeX uses to create your bibliography.
- Document.bbl This is the LaTeX version of your BibTeXed bibliography. You can change small problems with your bibliography here. Remember that any changes will be lost when you run BibTeX.
You may see two other types of files when you use LaTeX. These files are available from CTAN.org and expand the capabilities of LaTeX or BibTeX.
- Anything.sty You will be able to use this file if you place it in the same folder as your document or in LaTeX's root folder. It must be included as a package in the .tex document by adding \usepackage{Anything}.
- Anything.bst This file extends BibTeX and changes how your bibliography looks.
Multiple Columns
You may need to use multiple columns (similar to what you see in a newspaper) for a special page or for your entire document. You can either use LaTeX's built-in support or a package called multicol. While multicol can make only a page multiple columns, LaTeX makes the entire document multiple columns.
If you want to use LaTeX, add twocolumn option to the document class declaration as seen below:
\documentclass[twocolumn]{article} this is the very first line of the .tex file
You will have problems with any tables or graphics that are a page wide. We recommend using the multicol package to eliminate as many problems as possible. Remember to include multicol as a package as described in the Using Packages section. It will switch to multiple columns without a page break before or after the multiple column text.
\begin{multicols}{ # columns}[ header text][ space]
text in multiple columns
\end{multicols}
The required # cols determines the number of columns of text. The optional header text is printed in a single column along the top of the multi-column text. The optional space changes the necessary amount of space left on a page to make the text start on a new page.
Comments
In LaTeX, you can easily add comments to your working copy without anything appearing in the printed-out versions you will show your professor. Paragraphs you know will need later, comments on what needs to be added or revised, or pieces of text you don't want are perfect for comments. For large projects like theses, experts advise saving every piece of text you write, as you never know when that idea will become important. By commenting the text, it will turn red and not appear in the pdf LaTeX creates.
You can comment text by placing a percent (%) sign in front of any text you do not want to appear in the pdf. The remainder of the paragraph after the % sign will turn red and not appear in the pdf. In TeXshop, you can also select a piece of text and comment it out by going to the Format menu and selecting Comment. To make it appear in the pdf again, remove the percent sign or select the text and got to the Format menu and select Uncomment.
If you want to comment out just a few words in a paragraph, you can make up a command that will only comment out what is in the curly braces. Put this in the preamble of your document:
\newcommand{\comment}[1]{}
The resulting command is \comment{ the text you want commented out here}, used like so:
The growth of the plants was measured over three harvests by collecting main stems and recording the dry weights of the stem and grain, grain count and individual mass. The tissues were digested with acid \comment{what kind of acid?} and analyzed for mineral content with an inductively coupled plasma optical emission spectrometer.
Marginal Notes
LaTeX also allows you to create marginal notes, text appearing at the margins of the main body. The Torah uses marginal notes for the commentary of the main text, as well as many analyses and commentaries on standard texts. You can also use the marginal note command to highlight changes in the text with a vertical bar in the margin.
Using the marginal note \marginpar{This\\ is a \\ margin- \\al note} is so much fun...
You must include the manual line breaks (\\) because the marginal note box is so small (less than an inch across). With such a small space, LaTeX needs help breaking lines and figuring out hyphenation. You can place a vertical bar next to the paragraph using the following command:
\marginpar{\rule[-17.5mm]{1mm}{20mm}}
Making Space
Adding vertical or horizontal space is a quick fix solution for space problems. It should wait until the writing is finished as adding or removing text will often break the fix. We do not recommend it, unless it is absolutely necessary as LaTeX generally has a reason for its layout choices.
Vertical space:
\vspace{ width}
\bigskip
\medskip
\smallskip
The latter three are always relative to the current font and don't require a measurement argument (in the curly braces).
Horizontal space:
\hspace{ width}
As discussed in the general paper documentation, be sure to give the unit of measurement and do not leave a space between the number and the unit. In addition to the absolute values of inches (in), centimeters (cm), millimeters (mm), you can also use relative values em and ex. Em is the width of a capital M in the current font, and ex is the height of a lower case x in the current font. Also, you can use \fill in lieu of a precise measurement to mean "as much as necessary to make the text match up with the margins."
Fixing Bugs
LaTeX will sometimes take one look at your code and spew out an endless supply of errors. Here are a bunch of tips to get the problem fixed, so you can keep on writing.
- If you get a whole bunch of error messages, go to the first one. Often, one error will cause all the subsequent messages. If you fix the first error, the other errors will often disappear.
- The error has to be caused by something you added since it last ran correctly. This is obvious, but it pays off to examine any new writing for obvious errors (missing {, \, or misspelled commands).
- Use the line numbers given by LaTeX to narrow down where the error is. (The "Go To Error" button in TeXShop's console is helpful, but doesn't always deliver you to the actual source of the problem.) However, make sure to examine the line above and below it as LaTeX can be slightly off, or even paragraphs away (this is more rare). Under the Edit menu, use Line Number... to go to the line number given by the error message.
- If you believe there is no error, try pressing r to make LaTeX run despite any errors. Problems with the layout or text are clear indications that the error should not be ignored and found.
- If all efforts to find the error fail, use the comment feature to narrow down where the error is. The easiest way is to select half the text between the begin and end document commands and comment it out. If the error goes away, you know the problem is in the selected code. If it still has the error, the problem is in the non-selected code. Continue with this method of splitting the text until you narrow it down to one line. Now closely examine every word and LaTeX and look for forbidden characters like & and other possible problems.
- If this does not work, please come to CUS and ask for help. Ben Salzberg has seen a lot of errors in his time and will probably be able to fix it.
Typical Error Messages and their Solutions
- Extra alignment tab has been changed to \cr.
You have too many &s in a row of a table or array or eqnarray. - LaTeX Error: \begin{something} on input line line number ended by \end{document}
You've left out the \end{whatever}. Perhaps you're building a table or an eqnarray that has a bunch of lines and you've forgotten the \end statement. - LaTeX Warning: Reference ... undefined on ...
You have references in your document. You need to compile again so will be able to get the references right. - LaTeX Warning: There were undefined references.
You have references in your document. You need to compile again so will be able to get the references right. - Missing $ inserted
You left out a $ or \[ or \] or $$ somewhere when you were writing text that needs to be in math mode. - Paragraph ended before \end was complete.
You are probably missing an } at the end of an \end{something} statement. - Runaway argument?
A runaway argument occurs when you leave off a }. - Undefined control sequence.
You've tried to call a command that doesn't exist. Usually this is the result of a typo. Go to the line number mentioned in the error and look at all your commands. You'll probably find something like \rfac where you wanted \frac. Alternately, it is a command that requires a package, such as \textdegree (the degree symbol, which requires the package textcomp). You will need to specify that package in the preamble. - File whatever.sty not found
Your package isn't installed. Go to CTAN.org to download it, and follow the instructions for installation. If instead of whatever.sty the error message lacks a file extension, then you probably misspelled your graphic file's name or the file is not in the same folder as your .tex file. Similarly, if the file extension is .cls, you need to ascertain that the document class (like reedthesis) is in the right place and is spelled correctly. Reedthesis should be in the same folder as your thesis for ease of transport and security that you will be using the modified class and not a backup copy.
Splitting Documents into Separate Files
When you have a large document like a thesis, you often want to work on only one chapter at a time. Your latex file may become incredibly long and difficult to find individual paragraphs or parts of a chapter. If this sounds like a problem you have, you may want to split each chapter into individual files, using the \include or \input command:
\include{ filename(no extension)} or \input{ filename (no extension)}
\include will place the file after a new page. \input acts just like \include except that it puts the file right there without a new page and usually you can even keep your chapter headings, labels and preamble. For those reasons, \input is more useful in a thesis.
A few things to keep in mind:- The included (or inputted) file cannot have any preamble, not even a \begin{document} or \end{document}. Just comment those out or you will get an error that says "can be used only in the preamble" and then has the first uncommented line of the included file.
- It can't have an appendix, bibliography or backmatter. Just \chapters, \sections and the like.
- The \include sticks the contents on the next page. So if you are writing your introduction separately, you would want the chapter headings and labels to be in introduction.tex, not the thesistemplate.tex.
In other words, this is the first thing (uncommented) in my introduction.tex:
\setcounter{chapter}{1}
\chapter*{Introduction}
\addcontentsline{chapter}{Introduction}
\chaptermark{Introduction}
\markboth{Introduction}{Introduction}
And the thesis template looks like this:
preamble and everything
\begin{document}
frontmatter, abstract, all that deleted for space
\mainmatter
\pagestyle{fancyplain}
\include{introduction}
You can also include a bunch of files with one command, \includeonly{ file list}, where all the file names are separated with commas. You will always need to have the chapter command in the start of the included file (if you want chapters to be there at all), but you can define special headers in either the included file or the main file:
\fancyhead[LE,RO]{\thepage}
\fancyhead[RE]{\slshape \nouppercase{\emph{\sc{\leftmark}}}}
\fancyhead[LO]{\slshape \nouppercase{\emph{\sc{\rightmark}}}}
\include{results}
(See Changing Your Headers and Footers for more information about custom headers.)
Verse
Poetry needs to be specially formatted, whether you are quoting more than a line or creating an original composition. Despite its background in math and the sciences, LaTeX does an outstanding job of formatting poetry correctly, with support for stanzas and proper formatting of lines longer than the width of the page.
Here is an example of the verse environment:
\begin{verse}
It is an ancient mariner, \\
And he stoppeth one of three. \\
`` By thy long grey beard and glittering eye, \\
Now wherefore stopp'st thou me?
``The Bridegroom's doors are opened wide,\\
And I am next of kin;\\
The guests are met, the feast is set:\\
May'st hear the merry din."
He holds him with his skinny hand,\\
`` There was a ship," quoth he.\\
`` Hold off! unhand me, greybeard loon!"\\
Eftsoons his hand dropt he.
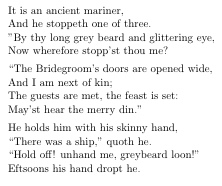
\end{verse}
This is how it looks once it is typeset by LaTeX: